

Developing a Product Mascot: From Imagination To Technical Design
From Paper Sketch to Production-Ready Rig: The Process of Creating ELI, Our Robot Companion and Company Mascot
What does it take to turn a pencil sketch into a mascot who can wink, wave, and explore the galaxy? Meet ELI, our robot companion—and a case study in maintaining design integrity. We’ll explore how a traditional sketch-first workflow coexists with modern AI tools, when to step into 3D to probe form in physical space, and why rapid, honest iteration is the most direct path from idea to production.
In an age where AI tools can accelerate iteration and visualization, maintaining a clear design vision and solid reference material is more crucial than ever. This made it even more important that we followed a traditional process to ensure that our mascot had a strong creative foundation. While the core of ELI’s design was developed entirely by hand, the team also used various methods, including several AI tools, to explore ideas and variations, gather feedback, and spark new derivatives, treating each of these tools as complementary rather than a replacement for the design process itself.
Where does the design process begin?
While digital tools play a key role in modern design, I still prefer to begin every project on paper. Sketching by hand comes naturally to me - it allows me to quickly explore proportions, silhouettes, and design variations while looking for those distinguishing traits that give a design its personality, without getting bogged down in details. This step emphasizes speed and flexibility: feedback could be integrated almost immediately, and new iterations could be produced in minutes.

After several rounds of paper sketches, I transitioned the concept to Photoshop and Illustrator to refine the design further.
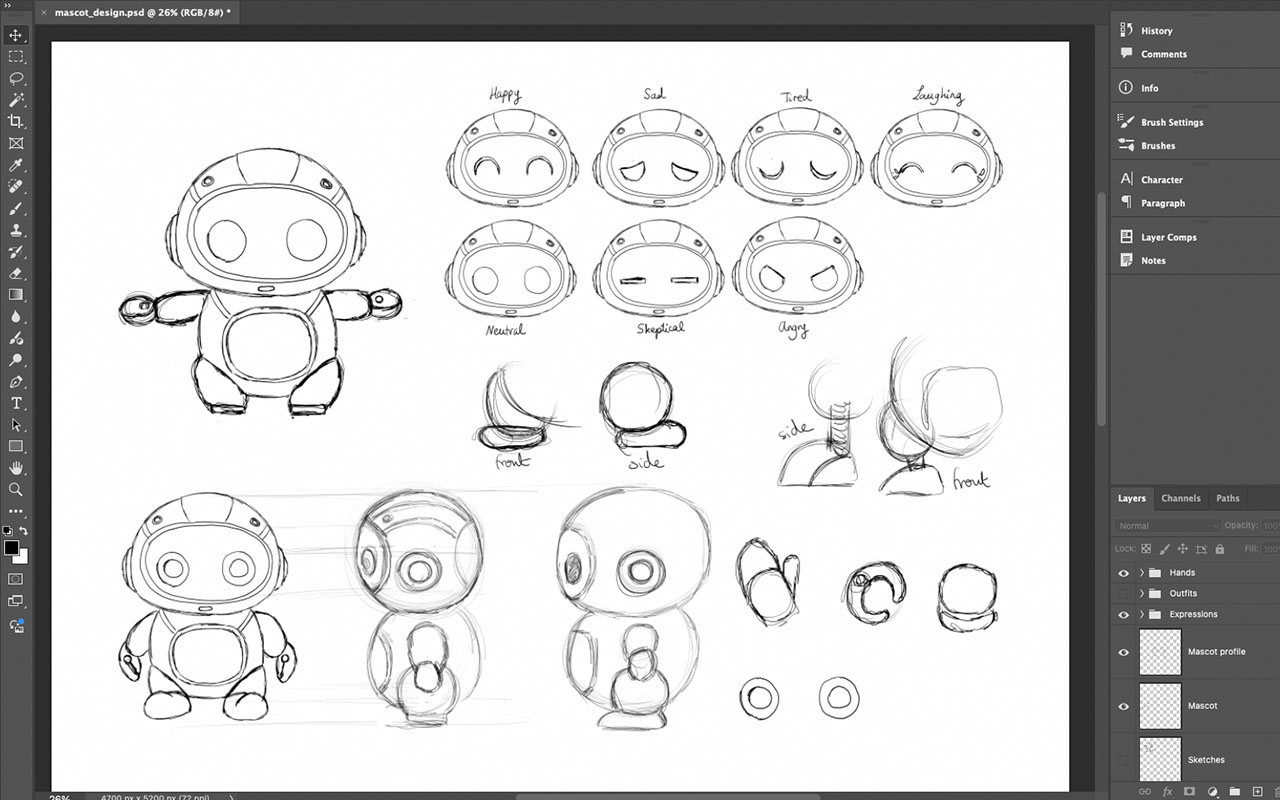
Working digitally introduced additional flexibility - colors, proportions, and small adjustments could be tested without redrawing the entire figure. During this stage, we also experimented with AI tools for quick brainstorming and exploration of alternate visual directions. These prototypes were useful for generating ideas, but all static 2D images - whether drawn by hand, refined digitally, or generated through AI - could only go so far in conveying form and movement.
When is the Best Time to Transition from 2D to 3D?
It was time for ELI to leap off the page and start moving through space, just as they would within our platform. To fully understand the proportions, balance, and personality of our robot companion, moving into 3D became essential. Blender allowed me to translate these explorations into a consistent, testable design that aligned with our creative and branding goals.
With the concept established, I began creating a 3D model of ELI in Blender to refine the robot’s form and capture finer design details. I chose Blender out of familiarity and because it is open-source, free to use, and integrates multiple stages of the pipeline — modeling, rigging, texturing, animation, and rendering — into a single platform. This all-in-one environment made it possible to move directly from concept to a working prototype that could be evaluated in three dimensions.
The modeling process began by blocking out the character using primitive shapes to match the proportions from the sketches. Once the overall form was established, I gradually refined the model by smoothing shapes, adjusting proportions, and defining areas like the arms, legs and head more clearly. Using Blender’s modifiers such as Mirror and Subdivision helped maintain symmetry and kept the topology clean for posing and animation.
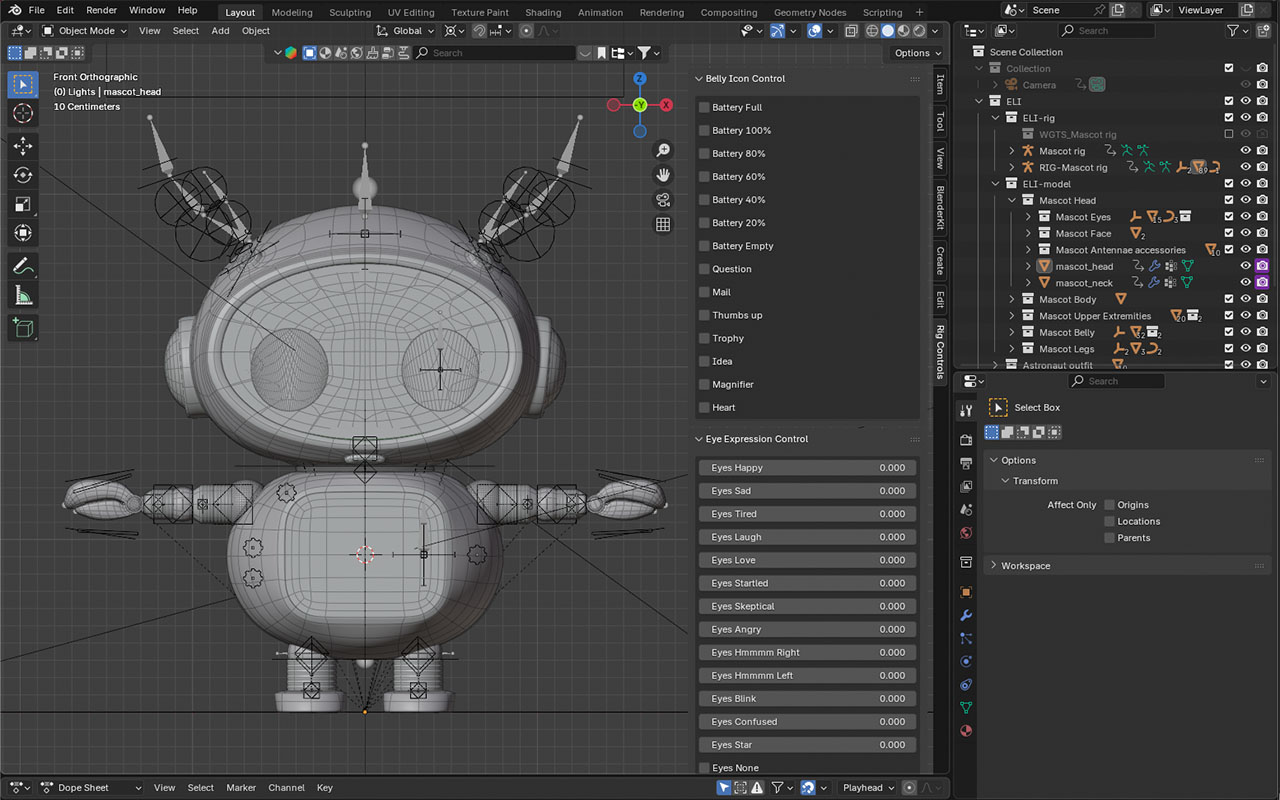
Rigging was introduced early to create an immediate feedback loop. It was important to stress-test the design, ensuring the model’s geometry and articulation could handle the dynamic poses and movements we anticipated needing.

Even simple animations provided valuable insight, transforming the playful character on paper into something more tangible. These motion tests highlighted both strengths and limitations of the design, leading to adjustments in geometry and articulation.
We also leveraged our Blender model to print several iterations of ELI on a 3D printer, allowing the team to explore its proportions in the physical world and provide more precise feedback on design and balance.
Why is Iteration so Essential to Great Designs?
We learned a lot through the iterative process of designing our robot. The workflow was not strictly linear. Like all prototyping processes, it involved exploring, refining, and sometimes discarding many ideas along the way.
For instance, the first robot design was ultimately set aside when we decided to pursue a different version of ELI that better aligned with our evolving vision. We also reworked the robot torso and legs repeatedly until we were satisfied with their form and balance. However, these iterations were far from wasted effort. Instead, they were essential stepping stones, refining both the character and our understanding of what the companion should represent. The time spent on this exploratory work was an investment that guided us to the final, more true-to-brand version of ELI.
Throughout this process, we used a mix of traditional and modern tools. Paper sketches and digital drawings provided the foundation for rapid brainstorming, while AI-assisted visualization supported broader exploration and faster feedback loops. Blender then served as the environment where these ideas converged into a testable 3D prototype. This hybrid workflow proved especially effective - combining the creative freedom of sketching and AI brainstorming with the precision and realism of hands-on 3D modeling and rigging.
By having a highly detailed, rigged Blender model as our source of truth, we gain immense creative control in posing. This also unlocks capabilities like producing finely tuned reference assets, which help AI tools generate results that stay closely aligned with our design intent and brand.
Feedback Is Where Imagination Meets Design
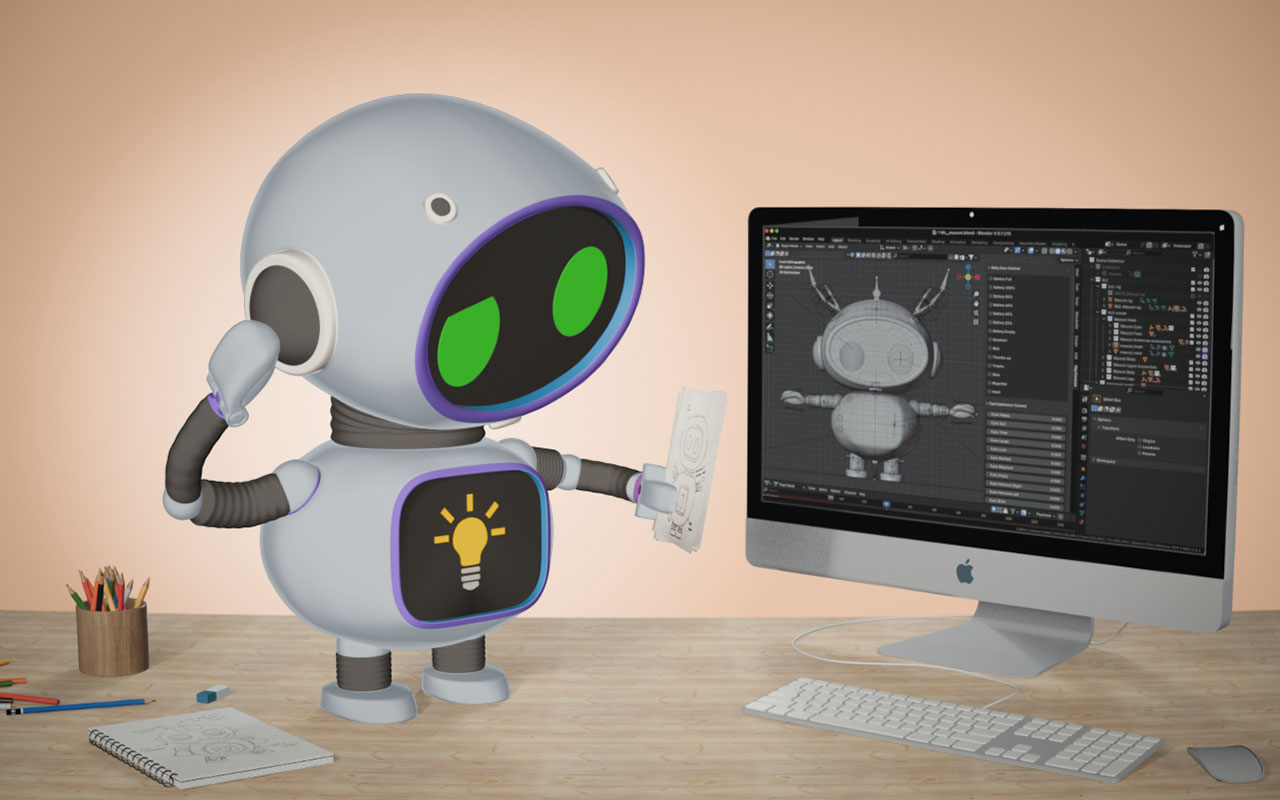
The journey of creating ELI is a demonstration of a highly iterative, hybrid workflow - one that bridges traditional craftsmanship and modern technology. By grounding the design in hand-drawn sketches and refining it through digital tools like Photoshop, Illustrator, Blender, and various AI tools, we combined speed, precision and realism at every stage.
Early rigging and motion tests ensured that ELI was not only an engaging visual, but also a robust 3D asset ready for production use cases. This process showed that the true strength of digital tools lies in supporting a thoughtful, technically informed, and intentionally designed foundation with the most human feedback loops possible. It also enabled non-artists to share ideas visually, allowing them to provide feedback through images rather than text. In the end, ELI’s journey from sketch to simulation captures exactly what engineering design is about - turning imagination into something that can be brought to life.
ELI’s story is just getting started. If you’d like to follow ELI’s journey, sign up for our newsletter!