
Building Structured Animations with Rive
Lessons learned, limitations encountered & techniques that proved most useful.
This is Part 3 of our Rive series. Start here with Choosing Rive for Mobile Animation.
Today we want to share some key lessons we’ve learned while building animations in Rive, focusing on how assets are structured and how animations are set up in practice, as well as the limitations we’ve encountered and some of the techniques that proved most useful.
Key Takeaways
- Use SVGs over PNGs and configure export settings carefully.
- Convert shapes to paths before binding them to bones.
- Account for bone scale propagating through the hierarchy.
- Organize layers and bones early to avoid costly rework.
Raster vs Vector Assets
When we first started building animations in Rive, we had to choose between the speed of raster assets and the flexibility of vectors. Here is what we learned about the hidden costs of each approach.
Working with Raster Images
We initially started using PNGs, as we already had rendered images available from Blender. This made it easy to bring assets into Rive and begin testing ideas right away, making it the fastest way to start experimenting.
This approach worked well for early exploration. It allowed us to focus on learning the Rive tools and some of Rive’s caveats and to figure out a design approach for the different assets we needed, including how ELI should eventually be structured as a vector-based character.
In practice, raster images are useful for quick iteration, while vector assets are better suited for production, where flexibility and control over deformation are essential. And so, as the project evolved, this led us to transition toward vector-based assets.
Working with Vector Images
Later, once we transitioned to using vector graphics. we started creating simple shapes, which gave more control over how they could be rigged and animated.
Working with vectors made it possible to bind shapes directly to bones and adjust how different parts of the shapes deform during animation. This fit better with the kind of animations we wanted to achieve, providing greater flexibility and control.
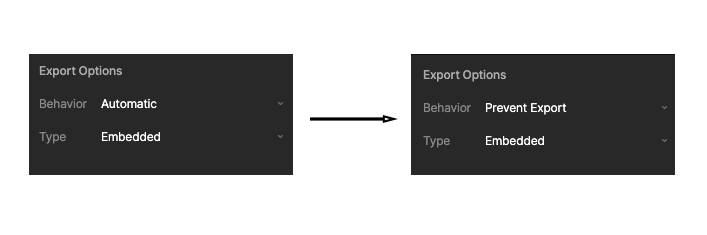
One thing we noticed, however, is that even after switching away from PNGs, the file size remained large. It turned out that the PNGs were still embedded in the final .riv file, even though they were no longer being used. Rive makes it possible to modify the export settings per asset. If the export settings are not configured properly, unnecessary assets may still be embedded in the final .riv file unnecessarily. This can be controlled via the Export Options.
Finally, we found that Rive initially treats certain Adobe Illustrator imports (such as stars and polygons) as parametric shapes. Pressing ‘Enter’ converts them into custom paths within Rive, which can then be bound to bones at the vertex level. This was one of the many times we ran into Rive-specific features and controls that, once mastered, are easily to use, but finding them in the first place can be a challenge.
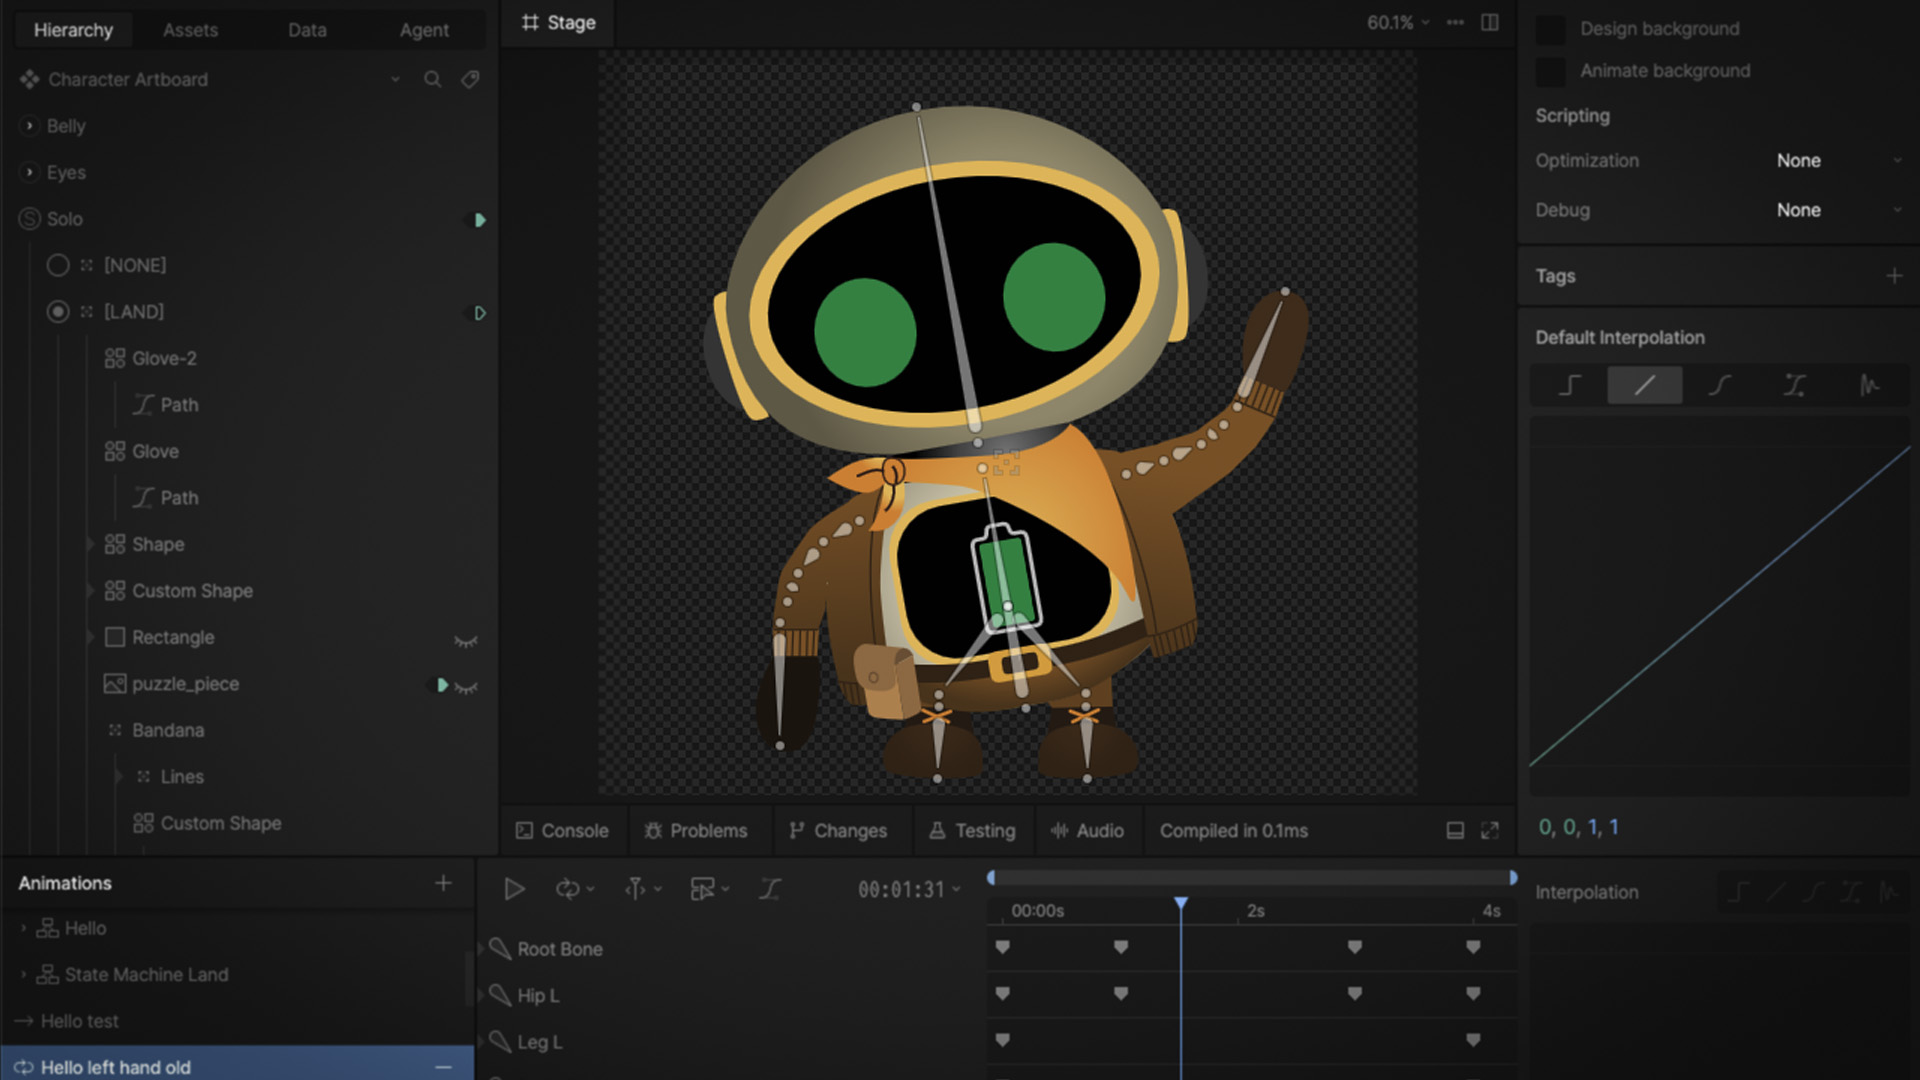
Rigging and Animating
Creating bones and binding meshes and shapes to them is fairly straightforward in Rive. However, Rive does not seem to provide more sophisticated automatic binding comparable to tools like Blender, so paths and vertices need to be selected manually when assigning weights.
Another limitation we encountered is the lack of control over transformation inheritance within the bone hierarchy. In Blender, it is possible to choose whether the scale is inherited. In Rive, however, if the parent bone is scaled, its child bones will scale accordingly. This means that the scale of those bones has to be manually adjusted to avoid visual distortions. In most cases, this behavior is expected and desired. However, it can become challenging when working with elements that are designed to stretch or extend. In our case, we designed some parts of ELI’s arms and legs to be expandable - which means that scaling one bone required compensating adjustments across the rest of the chain to avoid visual distortions. For example, here we have ELI’s arm and hand stretching as the root bone is scaled.
Organizing Layers and Bones Early
Keeping layers and bones organized from the beginning is essential as animations grow more complex. If the structure is not set up properly from the start, it may require significant adjustments later, as changes to hierarchy can affect positioning, transforms, and animation behavior.
A good approach is to define a clear structure early on, grouping related elements logically and ensuring that bones are placed within the correct hierarchy before animation begins.
Another important consideration is that visibility depends on the position of assets within the layer structure.
In our setup, we organized the character into three main groups: one for the eyes, one for the belly icons, and one for the rest of the character. The latter is a solo group that allows me to change ELI’s appearance depending on the environment.
The eyes and the belly icons need to remain on top of the rest of the character and be consistent across all the character variations, so those groups are above the solo group. However, this creates edge cases. For example, if ELI is holding something in front of its body, elements like the eyes or belly display may need to be hidden. In these cases, layer ordering alone was not sufficient. As a workaround, we use the group’s blend percentage to temporarily hide specific elements as needed. Some of this is inevitable as a rive file gets complex, and we always have the option of separating concerns as needed.

Conclusion
Structuring assets and setting up animations correctly early on has a significant impact as projects grow in complexity. Choices around asset types, hierarchy, and rigging approach all affect how flexible and maintainable the animation system will be. In our next Rive post, we focus on how these animations behave at runtime, including gradients, artboards, state machines, and data-driven animation.